403 Forbidden
ERR_WEB_NGX_403

Whether you’re planning a full twin-wall flue setup or connecting to an existing chimney, this guide explains everything you need to know about installing a wood-burning stove – step by step, from preparation to first burn.
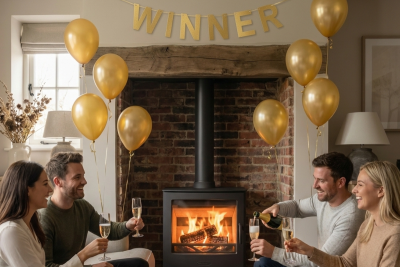
From the soft crackle of burning logs to the comforting glow that fills the room, it’s no surprise that wood-burning stoves remain one of the UK’s most loved home upgrades. But installing one correctly isn’t just about ambience – it’s about safety, efficiency, and compliance with UK Building Regulations.
To get started, watch this video to get a better understanding of what to expect from the stove installation process:
Pro Tip: Even if you’re using a professional installer, understanding the process helps you plan your layout, budget effectively, and ensure every detail meets modern eco-friendly standards.

Before anything else, you’ll need to choose where your stove will go – and that’s about more than just looks.
Your stove must be positioned where it can heat the space evenly, vent efficiently, and meet safety distances from flammable materials.
Every stove needs oxygen to burn fuel efficiently. Modern homes with airtight insulation may require a dedicated air vent or direct air kit.

Before fitting can begin, make sure you’ve got all the core components ready.
| Part | Purpose | Notes |
| The Stove | Your chosen wood-burner | Choose size & output suitable for room |
| Hearth | Non-combustible base | Stone, slate, or glass; minimum 12mm thick for some models |
| Flue Pipe & Liner | Directs smoke out | 316-grade (standard) or 904-grade (high-temp) stainless steel |
| Register Plate | Seals chimney base | Prevents smoke and heat escaping upward |
| Chimney Cap / Cowl | Stops rain and debris | Also prevents downdraught |
| Fireproof Sealant | Seals joints | Must be high-temperature resistant |
| CO Detector | Safety device | Required by UK law in all rooms with solid-fuel appliances |
Pro Tip: Always check your flue diameter matches your stove outlet – typically 5” (125mm) or 6” (150mm).

A flue system safely channels smoke and gases outside. It’s the backbone of any stove setup.
You’ll likely need a flexible stainless-steel flue liner inserted inside your chimney. This:
You’ll need a twin-wall flue system – an insulated metal pipe that mimics a traditional chimney.
Twin wall flues can run:
Both must terminate at least 600mm above the roofline and be 4.5mm tall minimum for proper draw.
A strong, consistent draught:
If your flue isn’t drawing well, your installer may recommend a chimney fan or anti-downdraught cowl.

Before the stove arrives, a bit of prep work will make everything smoother.
If you have an existing chimney:
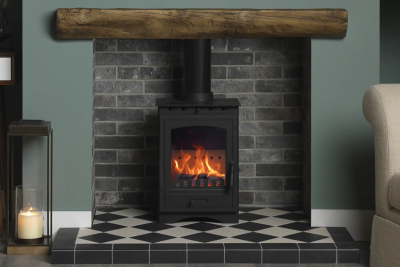
Your stove must sit on a non-combustible base such as slate, granite, or concrete.
For some freestanding models, a 12mm glass hearth is sufficient – always check manufacturer guidelines.
Check for existing air vents and ensure they’re unobstructed.
In modern airtight homes, your installer may recommend a direct air supply kit for optimal performance.

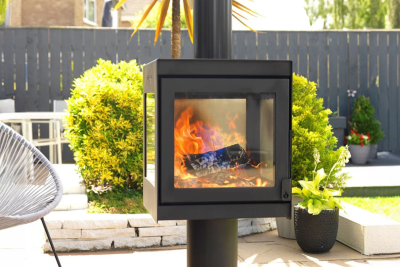
Not every home has a chimney – but that doesn’t mean you can’t enjoy a wood burner.
A twin-wall flue system creates a safe, insulated flue route where none exists.
Building Regs Reminder: Flue clearance must be 50mm (external) or 70mm (internal) from combustibles at all times.

Want the traditional look without the original chimney? Build a false chimney breast around your stove.
Pro Tip: A twin-wall flue system is required inside a false chimney. Always have it signed off by a HETAS installer.

Installing or altering a flue system in the UK is covered by Building Regulations Part J.
Using a HETAS-registered installer means your installation is automatically self-certified under Part J.
Installation costs can vary based on your setup, location, and complexity.
| Installation Type | Typical Cost | Includes |
| Existing Chimney Setup | £1,200 - £1,800 | Stove connection, liner, seaming, smoke test |
| No Chimney (Twin Wall System) | £2,000 - £3,000 | Full flue run, brackets, termination, sign-off |
| False Chimney Breast Build | £2,500 - £4,000 | Framework, boarding, flue integration |
*Costs exclude the stove itself and can vary by region. Always request itemised quotes from at least two certified installers.

Once your stove is installed and signed off, it’s time for the fun part – lighting it.
While it’s legal to fit your own stove under certain conditions, most homeowners choose a HETAS-registered installer for safety, compliance, and insurance reasons.
Remember: A poorly fitted stove can leak carbon monoxide, damage your property, and invalidate your home insurance.
Installing a wood-burning stove the right way transforms your home – not just in comfort and style, but in long-term safety and efficiency.
Whether you’re renovating a cottage fireplace or creating a contemporary false chimney wall, always follow building regulations, use quality components, and trust experienced professionals.
Explore our Ecodesign-compliant wood burning stoves here, and learn more about our installation service to get started.
Yes, but we only recommend it if you’re competent with solid-fuel systems and familiar with Building Regulations Part J. You’ll still need to have the installation inspected and signed off by Building Control, or use a HETAS-certified installer who can self-certify the work.
Almost always. A flue liner ensures safe, efficient smoke extraction and protects the chimney walls. Modern regulations and most stove warranties require a flexible stainless-steel liner (316 or 904 grade).
At least 4.5m from the stove outlet to the termination point, and at least 600mm above the roof ridge or nearby structure. These measurements ensure proper draught and compliance with Part J.
A liner fits inside an existing chimney, while a twin-wall flue is an insulated metal pipe system used when no chimney exists. Both perform the same function – safely venting smoke outdoors.
Regulations fall under Building Regulations Part J, covering air supply, hearth dimensions, flue termination, and carbon monoxide alarm placement. Using a HETAS installer guarantees compliance.
These costs exclude the stove itself and vary by region and access complexity.
Usually not – wood burners are considered permitted development. However, if your property is listed or in a conservation area, you may need approval for external flue placement. Always check with your local authority.
Yes. A twin-wall flue system allows installation in homes without chimneys, routing smoke safely through a wall or roof. These systems are insulated and fully compliant with Part J when fitted by professionals.
You’ll need a non-combustible hearth, typically made from stone, slate, concrete, or heat-resistant glass. Thickness requirements vary:
Most stoves require at least 150mm clearance from the rear and sides to combustible materials, but check your stove’s manual – distances differ by model.
At least once per year – or twice if your stove is used daily. Sweeping prevents soot build-up and reduces the risk of chimney fires.
No. Only seasoned or kiln-dreid logs with moisture content below 20% should be used. Wet or treated wood can cause smoke, tar build-up, and higher emissions.
If your stove outputs more than 5kW, a dedicated air vent is required. This ensures a steady supply of oxygen for safe combustion.
Yes – many estate agents say a stove can add to property value, especially when professionally installed and Ecodesign compliant.
This could indicate poor chimney draught or cold flue. Try pre-warming the flue with a lit firelighter before lighting your stove. Persistent issues may need a flue inspection or cowl adjustment.
Most installations are completed within 1-2 days, depending on whether a new flue needs to be installed. Complex setups or false chimney builds can take longer.
A single stove can heat multiple rooms if your layout allows heat flow, but for full-house heating you’d need a boiler stove or linked system. Some models integrate with central heating systems.
Yes! One of the best perks of a wood-burning stove is that it operates independently of electricity – providing reliable warmth even in a blackout.
<span class="clerk" data-template="@landing-page-blog" data-page="100277"